
You AirDrop a few photos from your iPhone and they land in Downloads as
IMG_4127.HEIC. Your Mac opens them fine. The upload form, the
print shop and your colleague on Windows do not. The fix is to convert them to
JPG, and your Mac can do that without installing anything.
Five ways to convert HEIC to JPG on a Mac
All five keep your photos on your Mac. Nothing is uploaded, which matters for pictures of your kids, your passport or your client's unreleased product.
1. Finder Quick Action: fastest for a batch
- Select one or more HEIC files in Finder.
- Control-click (or right-click) and choose Quick Actions › Convert Image.
- Set Format to JPEG.
- Set Image Size to Actual Size to keep full resolution.
- Leave Preserve Metadata ticked to keep the date and location, or untick it to strip them.
- Click Convert to JPEG.
The new files are saved next to the originals with the same names, ending in
.jpeg rather than .jpg. Both extensions mean the same
format, and every app and upload form accepts either. There is no quality
control here, so use Preview or Terminal if you need smaller files.
2. Preview: when you want to pick the quality
- Open the HEIC file in Preview.
- Choose File › Export.
- Set Format to JPEG and drag the Quality slider.
- Choose where to save it and click Save.
For several photos, open them all in one Preview window, click a thumbnail in the sidebar and press ⌘A. Then choose File › Export Selected Images, click Show Options, set the format to JPEG, and click Choose to pick the folder.
3. Photos: when the pictures are already in your library
- Select the photos in the Photos app.
- Choose File › Export › Export Photos. Avoid Export Unmodified Original, which gives you the HEIC back.
- Set Photo Kind to JPEG, pick a JPEG quality and set Size to Full Size.
- Turn Location Information off if you are sharing the photos publicly.
- Click Export and choose a folder.
Your crops, filters and other edits are applied to the exported JPG.
4. Terminal: one command for a whole folder
macOS ships with sips, a command-line image tool. To convert one
photo:
sips -s format jpeg IMG_4127.HEIC --out IMG_4127.jpgTo convert every HEIC in the current folder, whether the extension is upper or lower case:
for f in *.[hH][eE][iI][cC]; do sips -s format jpeg "$f" --out "${f%.*}.jpg"; done
Add -s formatOptions 85 after -s format jpeg to set
the JPEG quality, from 0 to 100. sips keeps the EXIF data,
including the date, camera and GPS location.
5. 2anything: if you convert more than photos
Full disclosure: we make 2anything. For HEIC to JPG alone, the built-in tools above are fine. 2anything earns its place if you also convert documents, audio, video or data files, because it handles all of them in one window.
- Drop one or more HEIC photos onto 2anything.
- Choose JPG. You can also pick PNG, WebP, AVIF, PDF, or text through OCR.
- Adjust the JPEG quality if you want to. The default is 85.
- Click Convert.
It keeps the colour profile and EXIF data by default, and a Strip metadata setting removes them, location included. Like the other methods, it runs entirely on your Mac.
Stop your iPhone saving HEIC
You have two options, depending on whether you want smaller files on the phone.
- Shoot JPEG from now on. Go to Settings › Camera › Formats and choose Most Compatible. Photos will take roughly twice the storage, and 4K at 60 fps and 1080p slow motion at 240 fps need High Efficiency.
- Keep HEIC on the phone, get JPG on the computer. Go to Settings › Photos › Transfer to Mac or PC and choose Automatic. Photos copied over a cable are converted as they transfer. AirDrop usually still sends the original HEIC.
What is a HEIC file?
A HEIC file is a photo stored in the High Efficiency Image File Format (HEIF), with the picture compressed by HEVC, the video codec also called H.265. HEIF was developed by the Moving Picture Experts Group (MPEG), the body behind MP3 and MP4, and is published as the standard ISO/IEC 23008-12.
Apple made it the default photo format in iOS 11 and macOS High Sierra in 2017.
The .heic extension means the HEIF file holds HEVC-coded images.
The more general .heif extension can hold other codecs. AVIF, the
newer web format, uses the same container with the AV1 codec.
The container borrows its structure from MP4. A HEIC file is a set of nested boxes, and that is why it can hold far more than one picture.
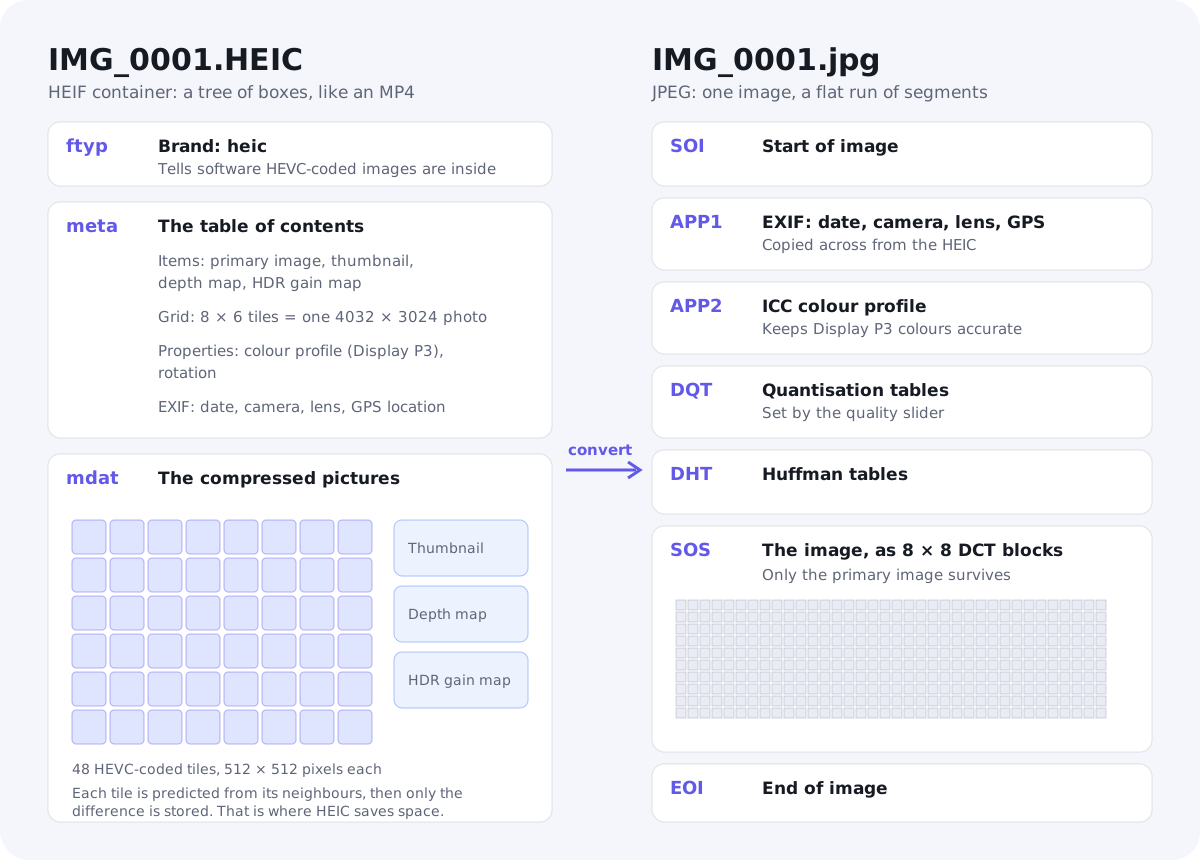
A photo from a recent iPhone typically contains:
- The primary image, stored as a grid of 512 × 512 pixel tiles that are compressed separately and stitched together when you open the file.
- A thumbnail, so Finder and Photos can show a preview without decoding the full image.
- Auxiliary images, such as the depth map that lets you change Portrait mode blur later, and an HDR gain map that brightens highlights on HDR screens.
- Properties, including the colour profile, usually Display P3, and rotation.
- EXIF metadata: the date, camera, lens, exposure settings and GPS location.
Live Photos are a HEIC still plus a separate .MOV video with the
same name. Converting the HEIC leaves the video alone.
HEIC vs JPG: what is different
| HEIC | JPG | |
|---|---|---|
| Standardised | 2015, iPhone default since 2017 | 1992 |
| Compression | HEVC (H.265) still-image coding | 8 × 8 discrete cosine transform |
| File size at similar quality | About half | Baseline |
| Colour depth | 8 bits per channel, 10 bits and more supported | 8 bits per channel |
| Transparency | Yes | No |
| Extra images in one file | Built in: thumbnails, depth maps, gain maps, bursts | One image; extras need add-on extensions |
| Opens on | Apple devices, Windows with an add-on, few web browsers | Everything |
Why HEIC files are half the size
Apple's own figure is that a HEIC photo takes up to half the space of a JPG of the same visual quality. JPEG dates from 1992. HEVC was finalised in 2013 and builds on two decades of research since. Four differences do most of the work.
- Flexible block sizes. JPEG cuts every image into fixed 8 × 8 pixel blocks. HEVC starts with blocks of up to 64 × 64 pixels and splits them down to 4 × 4 only where there is detail. A clear sky costs almost nothing.
- Prediction. HEVC guesses each block from the pixels around it, using one of 35 prediction modes, and stores only the difference between the guess and reality. JPEG barely predicts at all.
- Better entropy coding. HEVC packs the remaining data with CABAC, an adaptive arithmetic coder. JPEG uses Huffman coding, which is simpler and less efficient.
- Clean-up filters. HEVC runs deblocking and sample adaptive offset filters to smooth the edges between blocks. That lets it compress harder before artefacts become visible.
The cost is processing power. iPhones and Macs decode HEVC in dedicated hardware, so you never notice.
Why HEIC doesn't open everywhere
HEVC is covered by patents, licensed through several separate pools. Apple pays for a licence and builds a decoder into iOS and macOS. Many others have chosen not to. Windows usually needs the HEVC Video Extensions add-on from the Microsoft Store before it can show HEIC photos. Chrome and Firefox don't display them, so many web upload forms reject them outright. JPEG works everywhere, which is why converting is still the easiest way to share.
How HEIC to JPG conversion works
Whichever tool you use, a good converter goes through the same steps.
- Read the container. Find the primary image among the items in the
metabox, along with its colour profile, rotation and EXIF data. - Decode the tiles. Decompress each HEVC tile and stitch the grid back into one full-size image. This is the slow part, and Macs use hardware for it.
- Turn it upright. Apply the stored rotation to the pixels, so the JPG displays correctly even in software that ignores orientation tags.
- Handle colour. iPhone photos use the Display P3 colour space, which is wider than standard sRGB. Embedding the colour profile in the JPG keeps the colours accurate. Dropping it makes photos look dull.
- Encode the JPEG. Convert the pixels to brightness and colour channels, reduce the colour resolution, transform each 8 × 8 block with a discrete cosine transform, and round the results. The quality setting controls how hard that rounding is, and that is where detail is thrown away.
- Copy the metadata. Write the EXIF date, camera, lens and location into the JPG, with the orientation reset because the pixels are already upright.
What you lose when you convert
- A little quality. Both formats are lossy, so converting compresses the photo a second time. At a JPEG quality of 80 to 90 the difference is invisible at normal viewing sizes. Below about 70, smooth skies start to show blocks and bands.
- Storage. Expect the JPG to be noticeably bigger than the HEIC, often close to twice the size.
- The extras. Most converters keep only the primary image. The depth map, HDR gain map and burst frames are dropped, so you can't adjust Portrait blur later, and the photo shows in standard rather than HDR brightness.
- Extra colour depth. A 10-bit HEIC becomes an 8-bit JPG. You will rarely see it, but heavy edits to smooth gradients can show banding.
For photos you want to keep, a quality of 85 to 90 is a good default. For email and web uploads, 70 to 80 keeps files small. Quality 100 makes a much bigger file without any visible gain, because the HEIC was already compressed.
HEIC to JPG FAQ
Does converting HEIC to JPG reduce quality?
Slightly, because the image is compressed a second time. At a quality setting of 80 or above, you won't see the difference in normal use.
Why is my JPG bigger than the HEIC?
JPEG compression is less efficient than HEVC, so it needs more data to show the same detail. A JPG close to twice the size of the HEIC is normal.
Will the JPG keep the date and location?
With the methods above, yes, by default. Preview and sips keep the
EXIF data. In Finder, untick Preserve Metadata to remove it. In
Photos, turn off Location Information. Check before you post
photos taken at home.
Is it safe to delete the HEIC files after converting?
Only if you don't need the extras. Keep the HEIC originals if you might re-edit Portrait photos, want HDR versions, or simply want the best copy. They are also the smaller files.
Can I convert JPG back to HEIC?
Yes. Preview's export and Finder's Convert Image both offer HEIF. It makes the file smaller but can't restore detail the JPG has already lost.
Can Windows open HEIC files?
Often not out of the box. Windows needs the HEVC Video Extensions add-on from the Microsoft Store. Sending a JPG avoids the problem.
The short version
HEIC is a modern container for HEVC-compressed photos. It is about half the
size of JPG and holds extras like depth maps and HDR data, but not everything
can open it. To share a photo, convert it to JPG with Finder's Convert Image
action, Preview, Photos or sips, at a quality of 80 or more, and
keep the HEIC original if you might edit it later.